My Garage
My Account
Cart
Genuine Infiniti G35 Flywheel
Clutch Flywheel- Select Vehicle by Model
- Select Vehicle by VIN
Select Vehicle by Model
orMake
Model
Year
Select Vehicle by VIN
For the most accurate results, select vehicle by your VIN (Vehicle Identification Number).
4 Flywheels found


Infiniti G35 FLYWHEEL Assembly
Part Number: 12310-EY00A$1269.59 MSRP: $1550.17You Save: $280.58 (19%)Ships in 1-3 Business Days


Infiniti G35 FLYWHEEL Assembly
Part Number: 12310-CD001$1364.85 MSRP: $1666.49You Save: $301.64 (19%)Ships in 1-3 Business Days
Infiniti G35 FLYWHEEL Assembly
Part Number: 12310-JK20C$1136.26 MSRP: $1558.65You Save: $422.39 (28%)Ships in 1-3 Business DaysInfiniti G35 FLYWHEEL Assembly
Part Number: 12310-JK20B$1136.26 MSRP: $1558.65You Save: $422.39 (28%)Ships in 1-3 Business Days
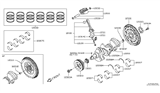
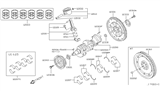
Infiniti G35 Flywheel
The Infiniti G35 Flywheel smooths out engine pulses by storing and releasing rotational energy, connecting the starter and clutch surfaces. The Infiniti Flywheel is attached to the crankshaft of the engine. It allows the V6 to spin evenly in between combustion strokes. Its outer ring gear cranks the motor when a key is turned in the ignition. Additionally, the Flywheel face provides a strong friction plate for the clutch disc to transfer engine power. Over the years, Infiniti owners have seen two traditional designs on the G35, namely the straightforward solid Flywheel design and the more convoluted dual mass Flywheel found in some G35 trims. The solid design is one piece of steel that may be lightly resurfaced to erase grooves or warpage, while the dual mass unit stacks primary and secondary plates with spring damping to mute vibration, cannot be machined, and can fail if its internal springs or bearings loosen. Various indicators such as heat spots, cracks, or chipped ring-gear teeth prelude many G35 owners that replacement is due, keeping every Infiniti G35 responsive and vibration-free.
Wondering where to find exceptional quality and economically-priced OEM Infiniti G35 Flywheel? You are at the proper online store. We offer all genuine Infiniti G35 Flywheel with a manufacturer's warranty at unbeatable prices. Order now and you can get brand-new parts at your door step with our fast shipping times.
Infiniti G35 Flywheel Parts Questions & Experts Answers
- Q: How to properly remove and reinstall a flywheel or driveplate during a Infiniti G35 transmission service?A:Raise the vehicle and securely support it on jackstands, then remove the transmission. For vehicles with a manual transmission, remove the pressure plate and clutch disc, taking the opportunity to check or replace the clutch components and pilot bushing if necessary. For those with an automatic transmission, check and replace the front pump seal or O-ring. Use paint or a center-punch to make alignment marks on the flywheel or driveplate and crankshaft to ensure correct alignment during reinstallation. Remove the bolts securing the flywheel or driveplate to the crankshaft, holding the driveplate in place with a lever or screwdriver to prevent it from turning. If the crankshaft rotates, use a pry bar or wedge a screwdriver into the ring gear teeth to jam the flywheel. Carefully remove the flywheel or driveplate, supporting it while removing the last bolt due to its weight. Clean the flywheel to remove grease and oil, inspecting the surface for cracks, rivet grooves, burned areas, and score marks, with light scoring removable using emery cloth. Check for cracked or broken ring gear teeth and ensure the flywheel is flat by using a straightedge. Clean and inspect the mating surfaces of the flywheel or driveplate and crankshaft, replacing the crankshaft rear seal if it is leaking before reinstalling. Position the flywheel or driveplate against the crankshaft, aligning the marks made during removal, and apply thread locking compound to the bolt threads before installation. Wedge a screwdriver into the ring gear teeth to prevent the flywheel or driveplate from turning while tightening the bolts to the specified torque. The remainder of the installation follows the reverse order of removal.
