My Garage
My Account
Cart
Genuine Infiniti G35 Hood
Engine Hood- Select Vehicle by Model
- Select Vehicle by VIN
Select Vehicle by Model
orMake
Model
Year
Select Vehicle by VIN
For the most accurate results, select vehicle by your VIN (Vehicle Identification Number).
5 Hoods found


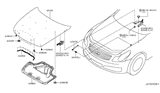
Infiniti G35 Hood
Part Number: F510M-JK0M0$638.89 MSRP: $940.58You Save: $301.69 (33%)Ships in 1-3 Business Days

Infiniti G35 Hood
Part Number: 65100-AM830$663.34 MSRP: $976.58You Save: $313.24 (33%)Ships in 1-3 Business DaysInfiniti G35 Hood
Part Number: F5100-AM8MM$663.34 MSRP: $976.58You Save: $313.24 (33%)Ships in 1-3 Business Days
Infiniti G35 Hood
The Infiniti G35 Hood refers to the hinged cover that rests over the engine bay of a vehicle, allowing access for maintenance. The panel may look clean and sleek, but it blocks rainfall, road debris, and potential vandals. It also pops open in seconds, allowing fluids to be topped up and belts inspected. The car is built on a platform that has a rear wheel drive balance and comes from the genes of the famed skyline. The Hood of the car complements that sporty elegance with a construction that folds during a crash. As a result, the Hood absorbs the impact before it reaches the passengers. The two main variations of Hood that buyers come across over the years are not by shape but by material. Traditional stamped steel versions are dent resistant but add weight to the appliance. By using aluminum, which is lighter, mass is reduced for sharper handling and less risk of surface rust. While fiberglass sacrifices some toughness, it does give the least weight and is easy to mold the signature grille line. Regardless of the type, all Infiniti emblems up front stay perfectly aligned and the style that is characteristic of a G35 is maintained. All drivers also get a Hood that is designed for the Infiniti G35 and that is safe.
Wondering where to find exceptional quality and economically-priced OEM Infiniti G35 Hood? You are at the proper online store. We offer all genuine Infiniti G35 Hood with a manufacturer's warranty at unbeatable prices. Order now and you can get brand-new parts at your door step with our fast shipping times.
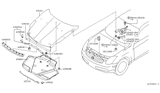
Infiniti G35 Hood Parts Questions & Experts Answers
- Q: How should the hood be removed and installed to ensure proper alignment and fit on Infiniti G35?A:The hood is heavy and somewhat awkward to remove and install, so at least two people should perform this procedure. Begin by using blankets or pads to cover the cowl area of the body and Fenders to protect the paint as the hood is lifted off. Disconnect any cables or wires that may interfere with removal, and make marks or scribe a line around the hood hinges to ensure proper alignment during installation. With an assistant supporting one side of the hood, take turns removing the hinge-to-hood bolts and lift off the hood, supporting it with your shoulder while doing so. Installation is the reverse of removal. For adjustment, fore-and-aft and side-to-side alignment of the hood can be achieved by moving the hinge plate slot after loosening the bolts or nuts. Scribe a line around the entire hinge plate to determine the amount of movement, then loosen the bolts or nuts and adjust the hood into the correct position, tightening the hinge bolts and carefully lowering the hood to check the fit. If necessary, the entire Hood Latch assembly can be adjusted up-and-down and side-to-side on the radiator support to ensure the hood closes securely and flush with the fenders. Mark around the hood latch mounting bolts for reference, loosen them, reposition the latch assembly as needed, and then retighten the bolts before checking the fit. Finally, adjust the hood Bumpers so that the hood is flush with the fenders when closed, and periodically lubricate the hood latch assembly and hinges with white lithium-base grease to prevent binding and wear.


