My Garage
My Account
Cart
Genuine Infiniti G35 Axle Shaft
Car Axle Shaft- Select Vehicle by Model
- Select Vehicle by VIN
Select Vehicle by Model
orMake
Model
Year
Select Vehicle by VIN
For the most accurate results, select vehicle by your VIN (Vehicle Identification Number).
29 Axle Shafts found


Infiniti G35 Shaft Assy-Front Drive,LH
Part Number: 39101-JK500$730.74 MSRP: $1002.38You Save: $271.64 (28%)Ships in 1-3 Business Days
Infiniti G35 Shaft-Side Differential
Part Number: 38231-JK500$687.11 MSRP: $942.53You Save: $255.42 (28%)Ships in 1-3 Business Days
Infiniti G35 Shaft Assy-Front Drive
Part Number: 39100-JK500$635.06 MSRP: $871.13You Save: $236.07 (28%)Ships in 1-3 Business Days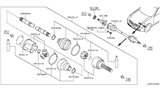
Infiniti G35 Shaft Assembly-Front Drive,L
Part Number: 39101-AL860$559.88 MSRP: $827.97You Save: $268.09 (33%)Ships in 1-2 Business Days
Infiniti G35 Shaft-Rear Drive,RH
Part Number: 39704-JK00B$167.53 MSRP: $230.75You Save: $63.22 (28%)Ships in 1-2 Business Days


| Page 1 of 2 |Next >
1-20 of 29 Results
Infiniti G35 Axle Shaft
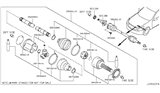
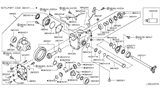
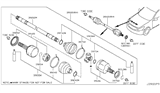
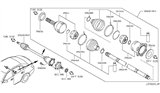
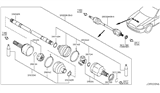
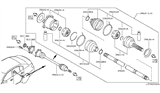
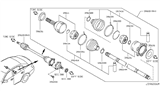
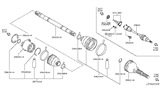
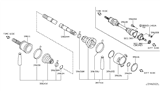
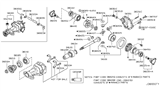
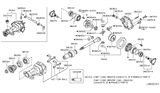
The Infiniti G35 Axle Shaft delivers engine power to each drive wheel while supporting weight and maintaining wheel alignment. Built as paired steel shafts, each Axle Shaft slides its splined inner end into the differential gears and links through a CV joint to the hub, allowing left and right wheels to rotate at different speeds in corners. Many G35 models use independent suspension, so a halfshaft style Axle Shaft replaces the older solid axle, sending torque through constant velocity joints that flex with suspension travel and curb vibration. Earlier rear drive layouts in the brand once relied on solid axles that housed the differential and Axle Shaft inside a rigid tube, but the Infiniti G35 change to halfshafts cut unsprung mass and sharpened handling. Key differences lie in retention, the solid unit may use C-clips or bolt-on bearings while the G35 halfshaft bolts to the hub and relies on CV boots whose integrity prevents noise and wear. Torn boots let grease escape, joints grind, and an Infiniti driver may feel shakes that signal a failing Axle Shaft. Strong chrome moly or carbon steel keeps the Infiniti shafts tough, yet harsh curb hits can still bend them or twist splines.
Wondering where to find exceptional quality and economically-priced OEM Infiniti G35 Axle Shaft? You are at the proper online store. We offer all genuine Infiniti G35 Axle Shaft with a manufacturer's warranty at unbeatable prices. Order now and you can get brand-new parts at your door step with our fast shipping times.
Infiniti G35 Axle Shaft Parts Questions & Experts Answers
- Q: How to remove the rear axle shaft on Infiniti G35?A:To remove the rear axle shafts, start by loosening the wheel lug nuts, removing the cotter pin from the axle nut and using a breaker bar and socket to loosen the axle nut. Then, raise and secure the rear of the vehicle with jack stands after which remove rear wheel(s). Remove the axle nut, mark on axle flange and Differential side gear flange and then unscrew all fasteners. Disengage axle shaft from differential side gear flange and remove outer end of axle shaft from hub. Look up torque value for side gear flange fasteners in repair manual, install new hub nut onto axle shaft, but do not tighten it until you have lowered vehicle. Put back wheel and lug nuts, lower it down a little bit and tighten lug nuts accordingly. Finally retighten drive hub slowly after that put a cotter pin to hold it in position. For front axle shafts on AWD models, the removal process involves loosening the wheel lug nuts, removing the cotter pin from the axle shaft/hub nut, and using a breaker bar and socket to loosen the axle shaft/hub nut. Raise front of vehicle secure with jack stands power off engine front wheels come out: Lift vehicle slowly on its front until weight is supported on jack stands take both wheels at once if possible Remove screws that hold engine undercover in place undo abs sensor wire Remove brake caliper and rotor being careful not to put too much pressure on hose suspend with wire Avoid tearing rubber boot when separating ball joint See how far knuckle can be moved outward before inner cv joint clears it Use either one Pulling an inner end out or carefully unscrewing fasteners release splines checked against marks For installation reverse everything making sure that right-side-axle-shaft is properly installed by shoving it roughly into inner CV joint splines Tighten suspension bolts to manufacturer's specification torque value check torque value of hub nut before applying it, use a new cotter pin Finally, install the wheel and lug nuts, lower the vehicle, and tighten the lug nuts to their torque.


