My Garage
My Account
Cart
Genuine Infiniti G35 Brake Disc
Disc Rotor- Select Vehicle by Model
- Select Vehicle by VIN
Select Vehicle by Model
orMake
Model
Year
Select Vehicle by VIN
For the most accurate results, select vehicle by your VIN (Vehicle Identification Number).
11 Brake Discs found


Infiniti G35 Rotor Disc Brake Front
Part Number: 40206-JL00A$80.60 MSRP: $125.92You Save: $45.32 (36%)Ships in 1-3 Business Days


Infiniti G35 Rear Disc Brake Rotor
Part Number: 43206-EG000$78.73 MSRP: $123.00You Save: $44.27 (36%)Ships in 1 Business Day

Infiniti G35 Front Disc Brake Rotor
Part Number: 40206-EG000$82.02 MSRP: $128.13You Save: $46.11 (36%)Ships in 1-2 Business Days
Infiniti G35 Rotor Brake
Part Number: 43206-JL00A$87.39 MSRP: $136.53You Save: $49.14 (36%)Ships in 1-3 Business Days


Infiniti G35 Rear Disc Brake Rotor
Part Number: 43206-JK600$93.77 MSRP: $127.58You Save: $33.81 (27%)Ships in 1-3 Business Days


Infiniti G35 Front Disc Brake Rotor
Part Number: 40206-JK600$92.06 MSRP: $125.25You Save: $33.19 (27%)Ships in 1-3 Business Days

Infiniti G35 Front Disc Brake Rotor
Part Number: 40206-AM800$76.81 MSRP: $120.00You Save: $43.19 (36%)Ships in 1-3 Business Days


Infiniti G35 Rear Disc Brake Rotor
Part Number: 43206-8H702$79.59 MSRP: $124.35You Save: $44.76 (36%)Ships in 1-3 Business DaysInfiniti G35 Rear Disc Brake Rotor
Part Number: 43206-CD005$186.57 MSRP: $253.83You Save: $67.26 (27%)Ships in 1-3 Business DaysInfiniti G35 Rear Disc Brake Rotor
Part Number: 43206-8H701$79.59 MSRP: $124.35You Save: $44.76 (36%)Ships in 1-3 Business DaysInfiniti G35 Rotor - Disc Brake, Front
Part Number: 40206-CD005$186.57 MSRP: $253.83You Save: $67.26 (27%)Ships in 1-3 Business Days
Infiniti G35 Brake Disc
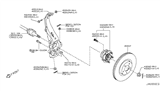
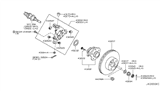
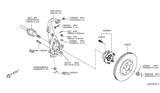
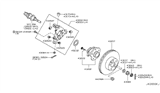
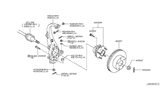
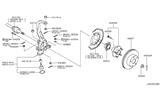
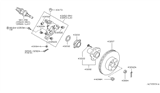
The function of the Infiniti G35 Brake Disc is to generate friction between the pads by pressing against the wheel. Each Brake Disc, made mostly of gray iron, is open to the air. As a result, it is less likely to fade when driving down mountains or stopping hard. In addition, the brake pedals are not a tricky adjuster. The G35's early and later models use a vented Brake Disc design, which conceals a series of fins between the two friction faces. This design improves the flow of air and release of heat. Moreover, performance models feature drilled or slotted surfaces, which sweep away water and gases to enhance braking bite. While this drilled or slotted surface is efficient, the downside is that they tend to wear out pads faster than conventional designs do. High-output versions also offer two-piece, lightweight composite options that separate the central hub from the friction ring. This reduces mass and limits warping, as the two parts can expand at different rates. All owners of Infiniti G35 sedans or coupes should inspect each Brake Disc to identify faults early. The Infiniti G35 brakes may start to screech or vibrate, or you may notice your car pulling left or right, or even just a reduction in friction. Any Brake Disc that becomes too thin or too scarred should be replaced to keep the Infiniti G35 braking edge.
Wondering where to find exceptional quality and economically-priced OEM Infiniti G35 Brake Disc? You are at the proper online store. We offer all genuine Infiniti G35 Brake Disc with a manufacturer's warranty at unbeatable prices. Order now and you can get brand-new parts at your door step with our fast shipping times.
Infiniti G35 Brake Disc Parts Questions & Experts Answers
- Q: How to inspect and replace brake discs (rotors) and perform related tasks in a Infiniti G35's braking system?A:Loosen the wheel lug nuts, raise the vehicle and support it securely on jackstands, then remove the wheel. Remove the Brake Caliper, suspending it out of the way with a piece of wire. Reinstall two lug nuts with washers to hold the disc securely against the hub, then visually check the disc surface for score marks, cracks and other damage. To check disc runout, place a dial indicator at a point about 1/2-inch from the outer edge of the disc and set the indicator to zero. An indicator reading that exceeds 0.003 inch could cause pulsation upon brake application and will require disc refinishing by an automotive machine shop or disc replacement. If disc refinishing or replacement is not necessary, deglaze the brake pad surface on the disc with emery cloth or sandpaper. The disc must not be machined to a thickness less than the specified minimum refinish thickness, which is cast into either the front or backside of the disc. Remove the caliper mounting bracket, mark the disc in relation to the hub, then remove the disc. Clean the hub flange and the inside of the brake disc thoroughly, then install the disc onto the hub assembly. Install the caliper mounting bracket and brake pads, then install the wheel and lower the vehicle to the ground. Tighten the wheel lug nuts, depress the brake pedal a few times to bring the brake pads into contact with the disc, then check the operation of the brakes carefully before placing the vehicle into normal service.


