My Garage
My Account
Cart
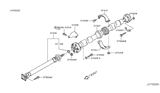
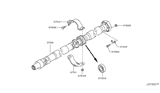
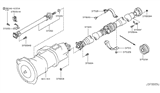
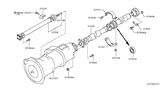
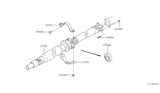
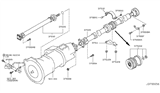
Genuine Infiniti G35 Drive Shaft
Axle Shaft- Select Vehicle by Model
- Select Vehicle by VIN
Select Vehicle by Model
orMake
Model
Year
Select Vehicle by VIN
For the most accurate results, select vehicle by your VIN (Vehicle Identification Number).
12 Drive Shafts found


Infiniti G35 Shaft Assembly-Front PROPELLER
Part Number: 37200-1CA1A$874.17 MSRP: $1199.13You Save: $324.96 (28%)Ships in 1-3 Business Days


Infiniti G35 Propeller Shaft Assembly
Part Number: 37000-JJ50A$1113.74 MSRP: $1527.77You Save: $414.03 (28%)Ships in 1-3 Business Days

Infiniti G35 Shaft Assembly-Front PROPELLER
Part Number: 37200-CG100$784.66 MSRP: $1076.35You Save: $291.69 (28%)Ships in 1 Business Day
Infiniti G35 Shaft Assembly-Front PROPELLER
Part Number: 37200-CL70A$784.66 MSRP: $1076.35You Save: $291.69 (28%)Ships in 1-3 Business Days


Infiniti G35 Drive Shaft
The purpose of the Infiniti G35 Drive Shaft is to move the car by transmitting engine power from the transmission to the rear or additional axles. This Drive Shaft is a hollow steel tube that has a yoke at each end and flexible joints to cope with suspension travel and keep the power on. The early versions of rear-wheel models use classic cardan U-joints, while the all-wheel versions of the Infiniti G35 have double cardan or Rzeppa CV joints to deal with sharper angles and curb vibration. The two-piece Drive Shaft, which has a center support bearing, is adopted by some trims, which splits the length for space constraints and balance requirements for G35 coupes and sedans. The split design keeps the Drive Shaft aligned and quiet. Regardless of the design style, Infiniti engineers place a high priority on shaft low weight and high torsional strength so the shaft resists shear stress yet spins with minimal inertia. It is common for U-joints to dry out or for the shaft to lose balance. From there, shakes start that get worse with speed. Keeping the Drive Shaft free of dents, well-lubed, and with intact weights will keep any Infiniti G35 vibration-free.
Wondering where to find exceptional quality and economically-priced OEM Infiniti G35 Drive Shaft? You are at the proper online store. We offer all genuine Infiniti G35 Drive Shaft with a manufacturer's warranty at unbeatable prices. Order now and you can get brand-new parts at your door step with our fast shipping times.
Infiniti G35 Drive Shaft Parts Questions & Experts Answers
- Q: How to remove and install the drive shaft on the Infiniti G35?A:To accomplish this, lift the vehicle off the ground and support it securely on jackstands, and then barricade in front of the wheels. To reach the driveshaft, take off the back part of the exhaust system. Draw a mark on how the driveshaft is related to the companion flange of differential, separate it from them by removing bolts. If the car has two sections of driveshaft, take away the middle bearing mounting bolts. Lower down the rear of driveshaft and afterward push it out of transmission through front yoke. While taking off shafts, wrap a plastic bag over transmission casing securing it with a rubber band to avoid losing fluid and for protection against contamination. The installation is performed in reverse order as its removal. If rotation has occurred on these components either by means of differential or transmission shafts; then they will not align hence leaving an unaligned shaft that cannot be put into place. Tighten attachment parts to required torque. Engage parking brake after raising vehicle's front end to be held secure by jackstands. Mark relationship between driveshaft and differential companion flange then remove bolts. Prop up Transfer Case using floor jack Remove mount bolts: slowly lower transfer case about 2 inches (50mm). This will help you detach the front part of driveshaft from front differential while removing splined yoke from transfer case unitize Installation procedure should be done as recounted in preceding paragraph except that new O-ring must be installed on splined yoke together with tightening drive shaft/front diff companion flange bolts accordingly.


